
My last post on how I write formal articles stressed the importance of figures. I thought it might be helpful to expand on that idea. In short, figures are a critical part of the communication process. Good figures separate the well-executed papers from the just good ones. They will reinforce your key points, allow you to write about your results in a more engaging manner, and help you learn more about your model in the process.
Put differently, you need figures in your paper. And the better they are, the better it is for you. These are my thoughts on them.
Why Should I Have Figures?
There are two connected reasons to have figures in your papers: clarity and readability. The majority of formal papers attempt to convince the reader that something that is not obviously true is, in fact, true. We jump through all sorts of hoops to accomplish this. Unfortunately, those hoops are often dense or dull (inclusive or). A picture is worth a thousand words, and replacing a thousand words of abstract mathematics is a win.
Regardless of the mathematics, you want to invite your readers to actually read your manuscript. If someone is skimming through articles, a 10,000 word wall of text is not going to stop them. It also will not stop someone who has read the first five pages and getting bored from closing the window.
But imagine instead one of these readers encounters a figure that shows them something really strange. Someone who was not planning to read your paper might want to learn how the figure came to be. And it might also convince your slipping reader that the ride is worth continuing.
What Should Be Made into a Figure?
My rule of thumb when making figures is to pretend that I am doing an invited talk for the paper I am writing. What do I want to put in the slides to illustrate all my main points? I do not want a slide that says “Proposition 3: The probability of war is nonmonotonic in its costs.” That is boring. I should instead have a plot that illustrates the point. After thinking about all of those slides I would want to make, I will then put almost all of them in the paper itself.
More concretely, I almost always want an equilibrium plot that varies a parameter of interest and shows how the equilibrium changes. These come in two forms. The first is one dimensional. If the narrative you are telling only focuses on one variable, then put that variable on a number line. Add some cutpoints on that number line, and describe the equilibrium behavior associated with it.
Here is an example from my Doubling Down paper:
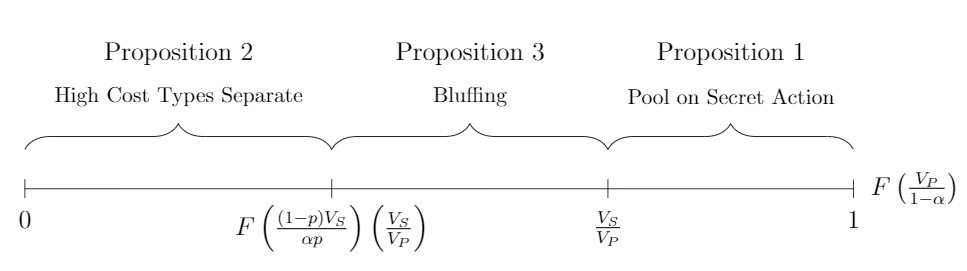
We are varying the quantity of a CDF evaluated at a particular value. Because it is a CDF, we have bounds on 0 and 1. There are two cutpoints also labeled along the axis that separate the three equilibrium parameter spaces. The top part gives a little context of what is happening in the equilibrium and matches that description to the corresponding proposition in the text. Keep in mind that these are not hard rules about what should be in the figure—what you ultimately put into it depends on what you think is important to communicate with the reader.
The second type figure is two dimensional. These are more complicated to build but are necessary if the narrative is on how large some quantity is related to another. The first step is to put all of the cutpoints in terms of one parameter. This becomes your vertical axis. Your horizontal axis is the other variable of interest. The equilibrium regions of the corresponding figure are now shapes that you can fill in with the critical information.
Here is an example from my Bad-Faith Cooperation paper:
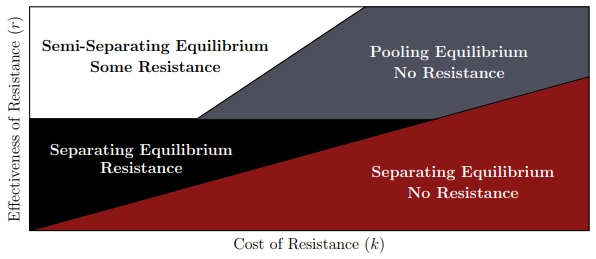
The two key parameters we vary in this figure are the cost and effectiveness of resistance. The labels tell the reader what type of signaling strategy the types adopt for each parameter space and how much resistance the actor chooses within the equilibrium space.
To actually draw two dimensional figures correctly, you need to use realized values of the parameters. It will often take some finagling to get the ideal spacing for each region and to make sure that the each parameter space you want to cover exists for those realized values. As a result, there are usually a lot of moving parts in the final figure you draw. I try to compensate for that by removing any extras that do not absolutely need to be in the figure. This is why the two dimensional figure does not have axis labels for the cutpoints, unlike the one dimensional figure.
Outside of equilibrium plots, you should consider drawing figures for any comparative statics of interest. Any nonmonotonicities or discontinuities always make the cut. Here is an example of that from my Credible Commitment in Covert Affairs paper:
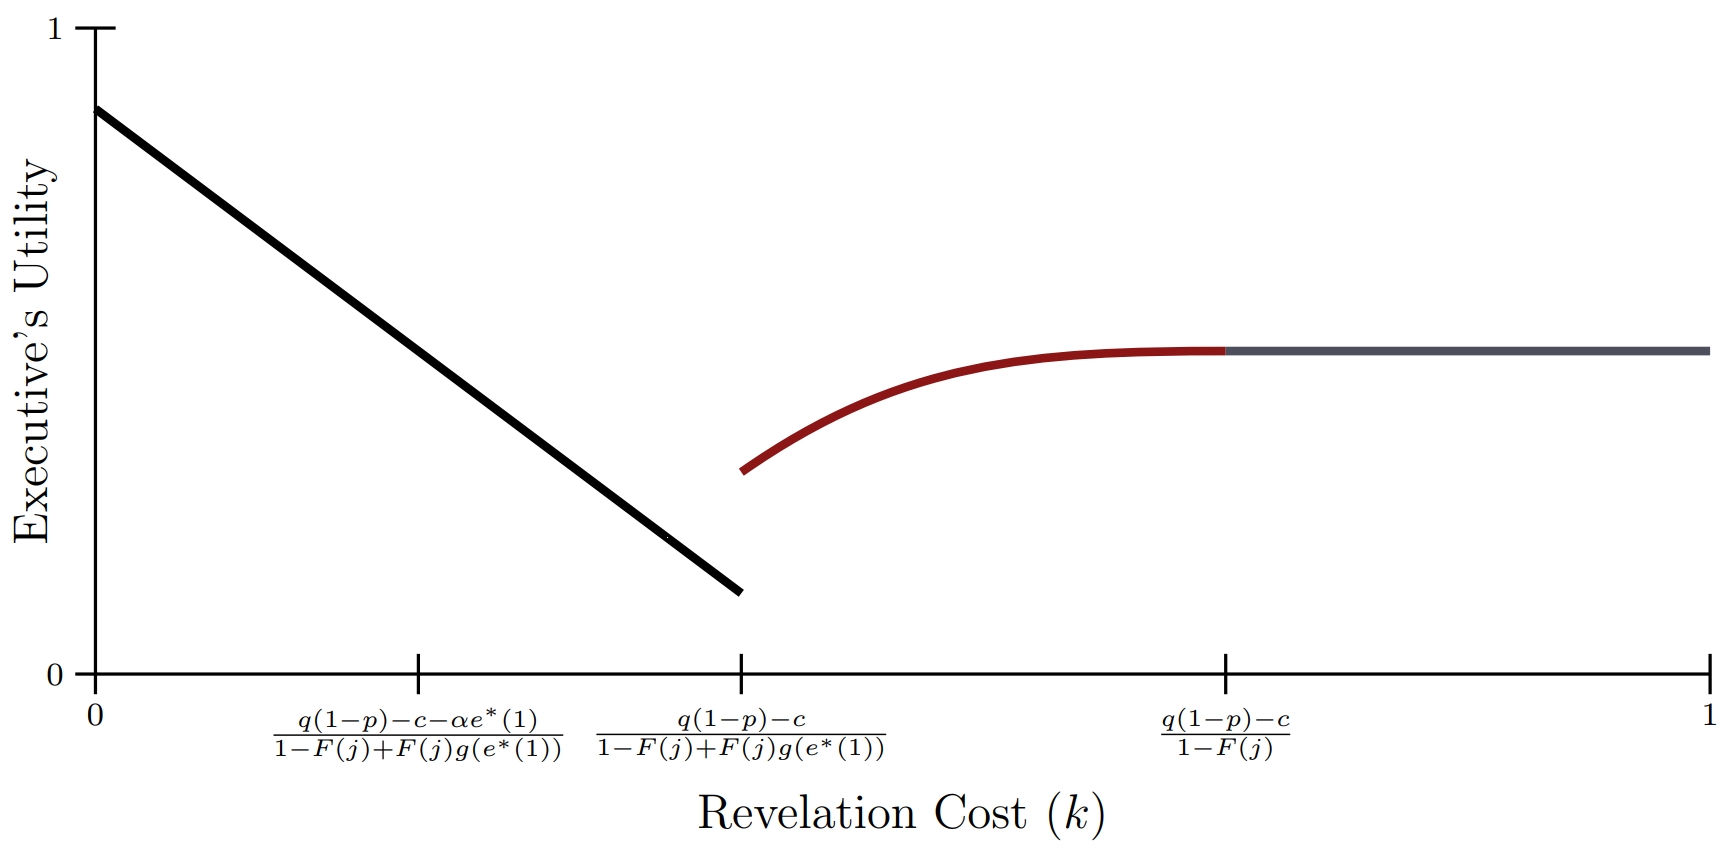
The horizontal axis varies how much trouble an executive gets in if a covert action is exposed. Even if I have lost a reader during the modeling section, there is a good chance that this figure will pull them back in. The executive would seem to be hurt by the potential to get into trouble. The black line on the figure would appear to confirm that. But why does it suddenly go up (red) and then level off (gray)? That is puzzling. I may just have pulled the reader back into the text to find out the answer.
For the most part, the only comparative statics do not receive corresponding figures are basic monotonic relationships, especially if the plot would be just a straight line. Even then, if something strictly increases before becoming flat, I may still want to include that.
How Do I Make Better Looking Figures?
Now that we have established why you should have figures and what is worth figuring, you may want to spend some time making those figure look more attractive. I have two tips here.
First, I strongly recommend TikZ. It integrates seamlessly with TeX, so you can insert math expressions at the proper cut points. It offers precision in what you draw that you cannot obtain from computer-assisted hand drawing. You can even use functions to draw your lines, meaning that you are visualizing exactly what the value is and not some approximation. And it is rendering all of this as a PDF, so your figures will scale nicely with the rest of your document.
The other major recommendation I have is to use color. Oftentimes, adding color will reduce the complexity of the figure, and it also helps make the figure pop out of the document. For equilibrium plots, this means giving each region its own color. Narrating the figure becomes easier, now that you can describe regions by color and not by location.
For estimated quantities, this means giving each value drawn its own color. Actor A’s utility could be black, while Actor B’s utility could be red. If there is only one line to be drawn, then sticking with black and white is fine. Sometimes, though, you will still want to use multiple colors for the same line. This can help distinguish between two regions of the figure as you are narrating it in the text. The utility plot above is an example of that.
The one word of caution I have here is that you are a researcher and probably not a graphic designer. When you start adding a ton of different colors, it is easy to inadvertently create clashing palette. The simple solution to this is to rely on preexisting sets of colors.
These are easy to find online, and universities conveniently give all of the information you need. A simple Google search consisting of the university name + identity (e.g., University of Pittsburgh identity) usually gives you what you need. The key piece of information is the RGB values for the brand colors. You can then define those colors in the preamble of your TeX file (e.g., \definecolor{cardinal}{RGB}{140,21,21}), and use the newly named color in the TikZ commands. I think that Stanford and University of North Carolina are particularly good for these purposes.
One thing to be mindful of is whether the colors are distinguishable in grayscale. Publishers now commonly allow for colored images appear in the online version of articles, but whatever goes to the printer needs to be black and white. Moreover, a peer reviewer may use an office printer to print your color PDF before reading it. Verifying that every color is distinct in grayscale will reduce that reviewer’s frustration.
